Monday 29 June 2009

THE NEXT LEVEL - ISSUE 5

.

Welcome everyone to


Issue 5 of The Next Level


We have been putting our 'creative hats' on again this week to bring you a mixture of your usual Challenge of the Week and a range of informative Tutorials, Freebies and really useful Hints and Tips.


Our Challenge of the Week features a Sketch which is one of your favourite kind of challenges and the Design Team have worked their magic to inspire you.


We hope you enjoy this edition and please remember to keep giving us feedback - we love to hear from you.


Ann and Dawn xxx

.


.


.

Challenge 4 Prize Winners

Our two prize winners this week, were chosen by Random.org - based upon the number allocated at the time the comment entry was made in the Challenge section.

The first selected prize winner is Cherry from Blodwyn3's Nights Dream - Congratulations Cherry you win the Joanna Sheen £20 Store Voucher - just click on the link to pop over to their shop and start choosing your goodies.

The second selected winner selected is Jill from Jill's Cards - Congratulations Jill you win the Stampin'Up 'A Little Bit of Happiness' stamp set and a Stampin Pad of your choice - the great prize from Zoe Tant - Stamping Scene.


Could you both please e-mail us at The Next Level so that we can arrange for you to receive your prizes.

.

Weekly Guest Design Team Announcement

The quality of the entries this week was oustanding. We did give you a more difficult Challenge this week, and a very time consuming one, but you certainly delivered in the effort you put into your creations. After another week with a very difficult choice, we finally decided that the Weekly Guest Designer winner of the week would be Jacque from Jacque's Joie de Vivre. We would love you to join us for Issue 7 of The Next Level and we will be in touch with you shortly to arrange.

Our previously Weekly Guest Design Team members are Linda from Funkie Junkie who has her design team card showcased this week, and next week we will be featuring Moni from Nixe07.


From the Challenge entries this week we will be choosing the feature Guest Designer for Issue 8, so lets see lots of entries from you all - we have given you a choice of two designs this week, so lots of oppotunities to be creative.

.

SPONSORS AND PRIZES OF THE WEEK

.

This week our two sponsors have donated fabulous prizes for the winners of the Challenge

.

We will have two winners of the week, drawn randomly on Sunday at 9pm 5th July, based upon number allocated at time of entry.


Our first Sponsor is Simon Says Stamp and they are donating another massive $25 Credit Voucher to spend in their Store. If you click on their name it will take you direct to the shop front where you will see a lots of wonderful items available to you - what a great prize.


Our second sponsor of the week is Bunny Zoes Crafts - a really great shop where you can choose goodies up to the Gift Voucher value of £15. Please click on the link to go and check out what is available.


The winners of this week's prizes will be announced under the Announcements section of Issue 6 out next Monday. They will be chosen by random number selection based upon the number allocated at the time of posting their challenge entry.

CHALLENGE OF THE WEEK


.


Well we know you love your Sketches, the Poll just over a week ago told us that - so this week we have given you a Sketch to create - we hope you like it.

If you are feeling extra creative this week, you can add stitches to your card which some of the Design Team have done - the choice is yours.


Click on the link below to download the actual size template. Just right click when the image opens and copy to your Desktop. Please make sure when printing this off that your printer is not set to make any adjustments to your image sizing.
.
Sketch 2 Template

The Design Team have produced a really lovely collection of Cards to hopefully give you inspiration for the Challenge and each have a really individual and completely different take on the Sketch itself.

A special thank you this week to Linda from Funkie Junkie, who joins us as the Guest Designer of the Week - thank you Linda.

By clicking on each of the cards they will open up to a larger size if you want to see more detail and also by clicking on the names over the photographs, it will take you to the individual blogs so you can see more photographs and details of how the cards were created.

.

ABBY

.


.

BETH

.

DAWN

.

DEBBIE

.

LINDA

.

MINDY

.


TRUE

.


Please post your challenge entries in the Comments section below and if possible please try to do a direct link to the card on your blog page - support on how to do this is in the Hints and Tips section.

Closing date for entries to be in for the prize draw is Sunday 5th July - 9pm UK time, but of course you can keep your entries coming in after that time to share with everyone if you wish to. The tutorial on how to post a link is under Hints and Tips - Enjoy!!

TUTORIALS OF THE WEEK


This week we have Three Tutorials for you.

.

Two are from Beth, one our brilliant DT members, she has created two instructional videos especially for The Next Level, covering the different ranges of Ink pads and Their Specific Uses and the Art of Masking Stamped Images.

The third Tutorial is Using The Colour Wheel, giving you an insight into how to use the wheel to help you choose colours for your designs.

.


Using a Colour Wheel

Using a Colour wheel will help you mix and match colours and help you select a colour scheme that will compliment and tone. It is quite easy to use and if you right click on the main image below you will be able to save this to your computer to refer to for future use.


The Colour Wheel


PRIMARY COLORS

Red, Yellow and Blue are the primary colors. These are the three basic colors that are used to mix all hues.

SECONDARY COLORS

Orange, Green and Purple are the secondary colors. They are achieved by mixing two primary colors together.

TERTIARY COLORS

Tertiary colors are more complex hues that are achieved by mixing primary and a secondary colors that are adjacent on the colour wheel.

OPPOSITE and COMPLEMENTARY COLORS

Opposite colors are diagonally opposite one another on the color wheel. You can work out the opposite color to any primary color by taking the other two primaries and mixing them together. The result will be its opposite or ‘complementary’ color.

ANALOGOUS COLORS

Analogous colors sit next to one another on the color wheel. These colors are in harmony with one another.

Some Formulas for Color Harmony

There are many theories for harmony. The following illustrations and descriptions present some basic formulas .

A color scheme based on analogous colors


Analogous colors are any three colors which are side by side on a 12 part color wheel, such as yellow-green, yellow, and yellow-orange. Usually one of the three colors predominates.

A color scheme based on complementary colors


Complementary colors are any two colors which are directly opposite each other, such as red and green and red-purple and yellow-green. In the illustration above, the opposing colors create maximum contrast.

.


We hope that you have found these Tutorials helpful and please leave a comment if you have the time to let us know what you think.


HINTS AND TIPS


Did you know???

Here are some more hints and tips that are worth a try…..

1. When adding small jewels and beads to your cards and projects, use a cocktail stick with a small amount of blue tack moulded onto the end, this will make it so much easier to pick up them up.

2. Before you throw away your old garments, remember to cut off any buttons, ribbons and pieces of lace etc. and these will always come in hand on your future projects.

3. If you are lucky enough to have a craft room, the easiest way to store ribbons is to wind them onto a piece of wooden dowel and create a rail effect, so they stay in good shape and you can easily just take the amount of ribbon that you need.

4. When you are embossing the back of your punched out flowers or die-cuts, rub some soap or a tumble dryer sheet on the reverse side, it will make your embossing tool glide over the surface and emboss without dragging.

5. When you have finished making your card or scrapbook page, do not throw away larger pieces of your craft paper, they make great tags for your envelopes to compliment your card.


Hyperlinking your Challenge entry

When you post your challenge entries in the comments section would you please try to add a direct link to your entry to make it easier for people to go to it direct and leave a comment. If you do struggle please do a copy and paste - but it does sometimes deter people from visiting if they have to deviate away from the blog page to do this.

1. First open up your blog page with the Challenge entry on the page and then right at very top of the page you will see the address of the blog page starting with http:// etc etc.

2 .Highlight your address bar by right clicking and select copy from the drop down menu. Now open up a Word document and just copy the address bar to the blank page.

3. Unfortunately you cannot type the link line into these instructions for you to copy and paste, as they will only appear on this page as Here's my Card - so the link line details below are actually a photograph, that you can right click upon and save the image to your desktop to refer to. Carefully type out the line into your Word document, omitting the blue letters and pasting in your blog address which you have already saved in your document. Be careful not to delete the inverted commas at each end.
4. Now right click and copy the whole new line with your blog address in it, and go along to the Comments page - add your comments and then right click and paste your entry line.

5. It is always worth previewing your entry on the comments page before you publish it just to make sure that it appears as a hyperlink so you know it will run properly - it should just show the words Here's my entry with no other detail.


HAVE YOU GOT ANY HINTS AND TIPS YOU WOULD LIKE TO SHARE?
Please do not be shy - take the time to post your hints below - every one will have a value to someone.

GRAB SOME STASH


We have been on the scout around again this week to find you some really gorgeous freebie downloads and we hope you will not be disappointed with what we have found.

This paper set is from Raspberry Road Designs, you will need to register and go through checkout process, but the kit is totally free. Click HERE direct to the page.


The matching Elements set for Swanky papers from Raspberry Road. Click HERE to go direct to the page.


A really beautiful paper set from Mary Beth Cryan blogspot - Click HERE to go direct to the Page. No registration required on this kit, just a straight download.

A really pretty brad set which do print out beautifully and look great in the centre of your flowers. Click HERE to go to the page.


Have fun everyone - and if you spot some great freebies out there, tell us about your find in the comments box below.

WHAT'S NEW OUT THERE?


This is your chance to feature in The Next Level. If you spot anything interesting or new that you think would appeal to our sense of creativity please leave a comment below and post a link to what you have found.

It is hoped that this section will be a really valuable source of inspiration and information to everyone and that you check in each day to see what has been newly posted.

Let's see what creative ideas you can all come up with!!!!

HAVE YOUR SAY !!!


We would love you to take the time to stop by this section and Please give us feedback on this issue of The Next Level - are we on the right track? - what do your want more of or less of? Your feedback will help us shape future Issues.

Thank you xx

SPONSORING THE NEXT LEVEL


If you are able to offer a prize sponsorship to The Next Level in return for a feature and link, please contact us direct on our e-mail address at the top of the page - we would love to hear from you.

Monday 22 June 2009

THE NEXT LEVEL - ISSUE 4


Welcome everyone to Issue 4 of The Next Level - and we have some fantastic items and treats in store for you this week. Again a massive thank you for your tremendous support - each day the number of Followers increases and the Challenge entries continue to grow.

Results of our Poll - Last week when we asked you to identify what you were looking for in the weekly Challenges, it was revealed that Sketches and Techniques were top of your list. We will of course be covering these over the coming weeks, but also use others to add flavour and interest for you. Thank you for your participation in the Poll, it really helps us to shape future issues. We will be carrying these out from time to time just to make sure we are on the right track.

This week we have Three tutorials.


Two are designed to support you this week with the Challenge of the Week. Your choices are a Free Standing Pop-up Card as demonstated by Debbie one our of creative Design Team Members, the second choice is the Stair Step Fold Card, with a tutorial to support you. The third is a brilliant and easy to understand Tutorial from Marianne on Colouring hair with Copic Markers.

Check out the Freebies also in Grab that Stash, some specifically chosen to give you some options and papers for the Challenge this week. Hints and Tips also offers some great ideas and support on loading your Challenge entry.


The rest is over to you - your comments and challenge entries make up the rest of our Magazine Issue, so please make sure you contribute regularly - we love to hear from you and see your fantastic creations.

Ann and Dawn xxx

.


.


.

Challenge 3 Prize Winners

Our two prize winners this week, chosen at random based upon number allocated at time of entry - the first selected is Sassy from Sassy's Secrets - congratulations Sassy you win the $50 Store Voucher for Simon Says Stamps - just imagine how many goodies you will be able to buy with that!!!!

The second winner selected is Veronica from VronCards. Congratulations Veronica you win the Tim Holtz Stamp Pads, Embossing Powder and Tools from The Artistic Stamper - we hope that you enjoy using these great products .


Could you both please e-mail us at The Next Level so that we can arrange for you to receive your prizes.

.

Weekly Guest Design Team Announcement

Wow the Challenge entries this week were stunning, so much detail and creativity going into your cards. There were possibly 10 cards on the table this week from which to select the Weekly Guest Designer, but our final decision is Moni from Nixe07. we would love you to join us for Issue 6 of The Next Level and we will be in touch with you shortly to arrange.

Our previously Weekly Guest Design Team members are Murielle from Scrapmumur who has her design team card showcased this week, and next week we will be featuring Linda from The Funkie Junkie

From the Challenge entries this week we will be choosing the feature Guest Designer for Issue 7, so lets see lots of entries from you all - we have given you a choice of two designs this week, so lots of oppotunities to be creative.

.

SPONSORS AND PRIZES OF THE WEEK


This week our two sponsors have donated fabulous prizes for the winners of the Challenge
.

We will have two winners of the week, drawn randomly on Sunday at 6pm 28th June, based upon number allocated at time of entry.
Our first Sponsor is Joanna Sheen and they are donating a £20 Credit Note to spend in the Store. If you click on their name it will take you direct to the shop front where you will see a lots of wonderful items available to you - what a great prize.


Our second sponsor of the week is Zoe Tant - Stamping Scene - Zoe is an independent Stampin'Up! Demonstator who is providing a great prize this week of 'A Little Bit of Happiness' set and a stampin pad - colour of your choice. Zoe is keen to offer support and advice to anyone keen to know more about Stampin'Up! products and availability - so click on the link to take you to her blog for more information.

.

A massive thank you to both of our sponsors this week for your generosity.


The winners of this week's prizes will be announced under the Announcements section of Issue 5 out next Monday. They will be chosen by random number selection based upon the number allocated at the time of posting their challenge entry.

STOP PRESS !!!!!

Scrap Revolution - sponsors of Issue 2 with the Making Memories Ribbon Slot punch tool now have them back in stock - so pop along there, follow the link in the sidebar to secure yours quickly before they go out of stock again !!!

CHALLENGE OF THE WEEK


.

This week, we are really spoiling you - how? -

We are giving you a choice of which design of Card you want to make up for your Challenge entry


STAIR STEP FOLD CARD

or

FREE STANDING POP UP CARD


Both of these techniques are covered in full for you in the Tutorial section, so maybe having a look at these will help you decide which one you want to create for the Challenge this week.
Remember you can print off the Tutorials for you to refer to as you create your card. They are both a little challenging, but the finished result is well worth the effort -they really will allow your creativity to blossom.

The Design Team were all asked to create the Stair Step Fold card, and Dawn has followed this style of card but turned it on its side, so this is an option too. Debbie has done both because we asked her to create a feature Free Standing Pop Up card as part of her tutorial this week, and she has done a magnificent job.
A special thank you this week to Murielle from Scrapmumur who is our Guest Designer of the week, she has produced a really beautiful card for us.

You will find hopefully lots of inspiration from the DT cards, there is also loads more information and photographs on each individual DT members blog - so just click on their name above the photo images and it will take you there. Clicking on the card itself will enlarge the card for you to see more detail

So - go create - we cannot wait to see what you come up with xx

ABBY


.


.


.

.
DEBBIE (2 cards)


.
.
.


Please post your challenge entries in the Comments section below and if possible please try to do a direct link to the card on your blog page - support on how to do this is in the Hints and Tips section.

Closing date for entries to be in for the prize draw is Sunday 28th June 6pm UK time, but of course you can keep your entries coming in after that time to share with everyone if you wish to. The tutorial on how to post a link is under Hints and Tips - Enjoy!!


TUTORIALS OF THE WEEK


Three Tutorials for you this week


Free Standing Pop-up Card, beautifully presented by Debbie in her creation of her Butterfly Magnolia Garden Card

.

Stair Step Fold card - which is the second option for your Challenge theme this week

.

Art of colouring hair with Copic Marker pens a feature from Marianne from I Like Markers on one of the tricky tasks we all encounter and that is how to colour hair correctly.

.

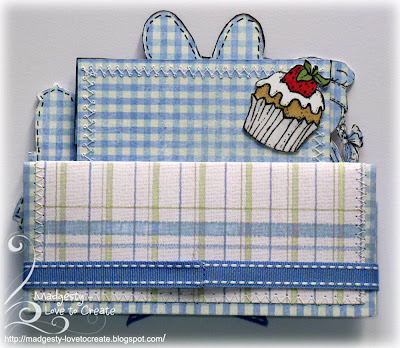
FREE STANDING POP-UP CARD
.

This week 
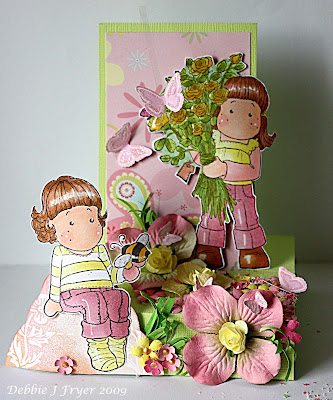
Debbie, our Design Team Member was asked to re-create a card that she did on her blog called Butterfly Magnolia Garden. The card is a free standing pop-up card, the folds flat. Debbie has taken the basic theory of creating this design of card, but has literally taken it to 'The Next Level' with her unique style and creativity in completing the card. We hope you will find inspiration from her creation


So over to Debbie for the step by step instructions on how to create this stunning card.....

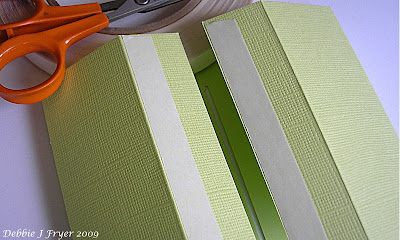
1. For the base, cut a piece of card 4¼” x 11”. Stamp at this stage if desired

2. Score at 1”, 2¾”, 3¾”, 5½”, 7¼”, 8¼” and 10”.


3. Mark ⅝” in from both sides on the 5½” scored line. Cut a narrow strip between these marks. Leave base card to one side for a moment.


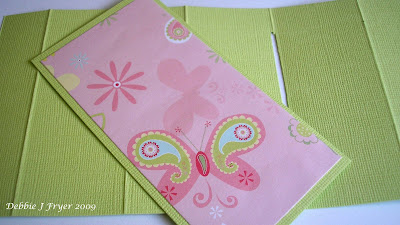
4. For the stand-up background cut a piece of card 2¾” x 5¼”.

5. Cut a piece of decorative paper 2½ x 5” and mat onto card you have just cut


6. Now back to the base card. Apply double-sided tape, or glue to the right side of the two 1” end sections. (One strip next to score line, and one at the edge). It is important to get this in the right place, as it will hold the tag in place. See steps 8 & 9


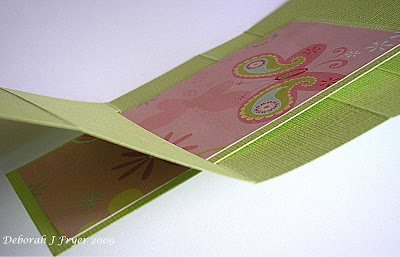
7. Pop the ‘tag’ through the slit in the base


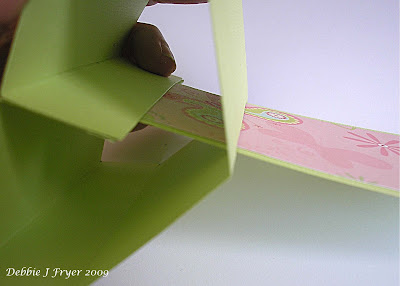
8. Turn over and fold base around, trapping bottom of tag in end folds.

9. Press on to tape or glue to secure.


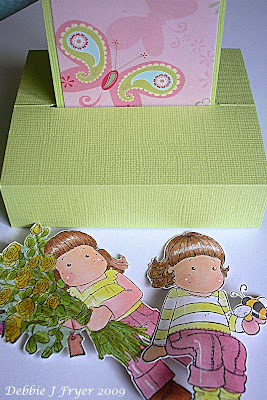
10. Congratulations, your card base is now complete. At this stage your card will fold flat to fit it in an envelope, however if the embellishmentsare bulky you may need to make a box for it to stand in.


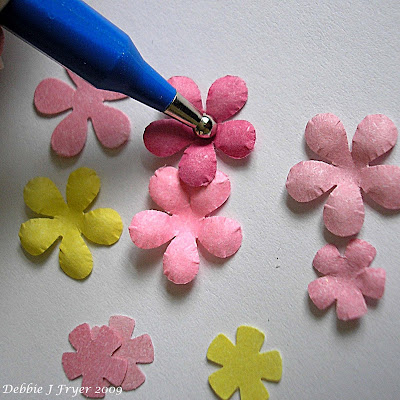
11. I used Prima hydrangea flowers; I also punched out flowers using an EK Success Retro Flower medium punch, that I shaped with a ball tool, and ready made paper roses. I used a Martha Stewart butterfly punch to make the butterflies


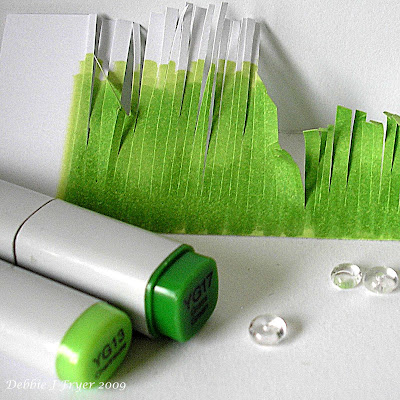
12. The tufts of grass were made by colouring ordinary copy paper then cutting slits along the length to make a fringe. The top was randomly shaped, then pieces cut off and added to the design where required.

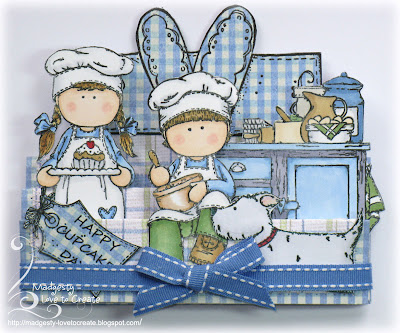
There are many different options and themes you can use. Just let your imagination run riot and have fun producing something truly unique. I chose to do a butterfly theme so this is my Magnolia Butterfly Card


.

STAIR STEP FOLD CARD


.

1. Cut your base cardstock to the size of 10.5 X 5.0 - if you want to stamp on this, now would be the time to do it

.

2. Score your cardstock at 1.25" - 2.5" - 4.25", 6" and at 8.25". When scoring remember to flip the paper back and forward when creating the score lines for the hills and valleys, it will make it easier to fold in the right direction and less chance of tearing. The smallest 1.25" fold is folded down as this forms the front of the card. See the card above to show the direction of the folds. If you want to mat and layer your base - glue or stitch this first before you score your cardstock.

.

3. At this stage if you want to, you can turn your card on its side (as in Dawn's card) this is called Accordian fold as opposed to Stair Step Fold.

.

4. You now start to add your design - it can be stamped images, punched images, stickers, cut-outs, the choice is yours - decorate to your hearts' content.
.

5. Remember that if you are giving your card away as a gift, you will need to tidy up the back of any images standing proud of the fold lines. If you are stamping and colouring your images, paste a patterned sheet to the back of your stamped image page before you cut it out, then when you do cut around it, you will have a pattern on the back that looks clean and pretty when viewed from the rear

.

6. To keep your Stair step fold card closed - there are many pretty ways to do this by adding ribbon detail. My example below is done simply by folding a piece of ribbon right around the closed card and marking with 2 pins where the ribbon joins at the rear. I then stitched it on the sewing machine and added a pretty bow to the front. This now slides off completely to allow the card to be opened, but can be fully closed and held in place by the ribbon band

.


Hope this gives you enough detail to create your Stair Step Fold card - I have given a detailed breakdown on the make-up on this card on my blog if you need more information


Have fun, Ann xx


.


COLOURING STRAIGHT HAIR WITH COPIC MARKER PENS


Our third Tutorial if colouring straight hair with Copic Markers and over now to Marianne who is a product specialist for Copic Markers, and has a fantastic blog I Like Markers, where she shares her knowledge and expertise on the art of colouring using Copic pens. This week Marianne covers the tricky art of colouring straight hair ........


To really get nice looking hair you have to understand a few things about hair:
• Hair is not all one color
• Hair catches light in small clumps, not flat
• Healthy hair is shiny, and shiny things have more contrast
• Hair has layers, a front side, a backside, and it curves around your head

When coloring hair, keep in mind:
• ALWAYS color in the direction the hair grows
• Streaks are OK, and the back of the paper doesn't need to be soaked.
• Try lots of different color combos until you get the look you want
• Pay attention to where you put your shadows.
• As you layer colors, leave bits of the base color peeking through to give your hair dimension.


As you begin coloring hair you should practice on some scratch paper to get the technique down. I've noticed in my classes that a lot of people have trouble with basic feathering using the brush nib.

This technique is useful for feather blending, making grass, and other basic coloring so if you are not comfortable with feathering I urge you to practice, practice, practice!

I feather by holding the brush at a slight angle and lifting up at the end of each stroke. Consistency is the key. I want each stroke to start in the right place and lift up in the same place as well.

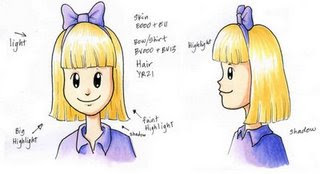
I want my hair to look a nice golden blonde color, so I'm going to lay down a base color of YR21. (Other good pale blonde base colors include Y00, Y11, Y21, YR31, though you should experiment on your own). You can see that with one color her hair looks OK, but it's not very exciting.

To make the hair appear shiny I am leaving highlights along the sunny front edge of the hair, and along the top of her head where the hair curves down to hang straight. The hair will be slightly darker on the shadow side of her head and down behind her head along the back of her neck. Now I can accent her hair and darken it up by adding streaks of Y28. To get thinner streaks I hold the marker more vertical and use only the finest tip of the brush. I deepen the darkest shadow areas by letting the base colors dry then adding another layer of color. Always color in streaks and leave some of the lighter areas show through. This keeps the hair from looking too flat.

Notice how the darker yellow really tones down the hair. Now it looks more believable as a hair color and you can see shape of her head better. I hope this helps you as you color. Have a great day!
.


We hope that you enjoyed the tutorials this week, and remember you can print of the Tutorial section in isolation if you want to refer back to them as you create your card and colour your images.